Drupal is a robust content management system that can do nearly anything you throw at it. Hundreds of Drupal modules–add-ons that extend the functionality of Drupal core–exist to help you create a powerful website.
This is a roundup of some excellent Drupal modules covering the following areas:
- Managing and displaying content
- User engagement and game mechanics
- User registration
Managing and Displaying Content
1. Menu Block
In many pre-built Drupal themes, the primary navigation bar (typically displayed across the top of the page) shows only top-level links. Drop-down, multi-level navigation is not automatically enabled in many themes. You can use Nice Menus to turn on fly-out and drop-down navigation, but you’ll still have to edit your theme files.
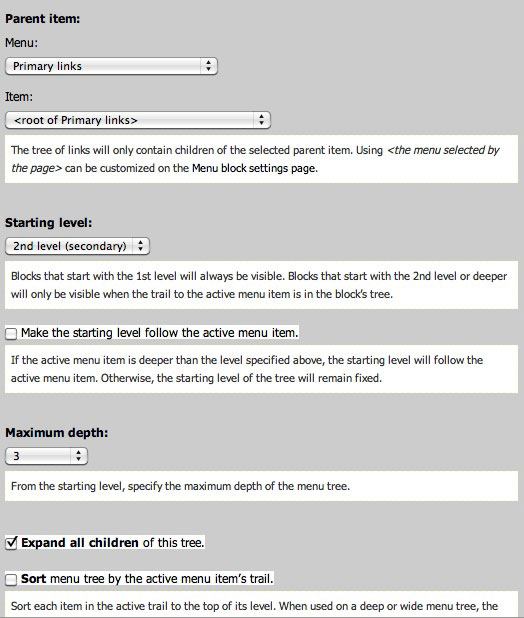
However, with the Menu Block Drupal module, you can easily add a new block that pulls all relevant navigation links together, and then you can place that new block anywhere on the page–in the content section, for example, or perhaps in the left or right sidebar.
Here’s a menu block set-up page that pulls links from the equivalent navigation menu and displays it as specified:
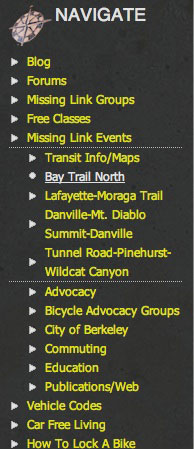
Here is the menu block in action, displaying the children of a particular page in the sidebar:
2. Node Reference URL Widget
Node Reference URL Widget (requires the nodereference and content module in CCK) is a useful Drupal module that lets you refer to one piece of content from another.
Let’s say, for example, that your website has a lot of nodes in a content type called "People"; Jane Doe, John Smith and Maria Miller are nodes in this content type. You realize that you need to assign each person to a category to better organize the page, such as:
- Staff: Jane Doe
- Board: John Smith, Maria Miller
- Volunteers: John Smith, Maria Miller
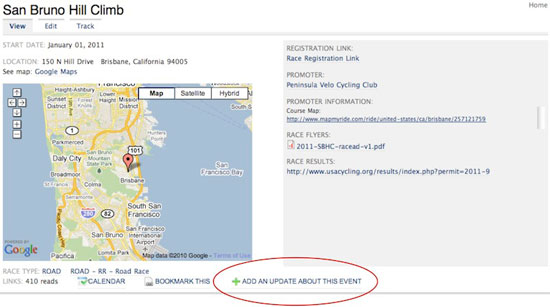
Using nodereference, you can assign each person to a parent category by creating a new CCK field. For example, you could assign a new person directly from the "People" category listing. In this scenario, on the details page for "Staff," you would click on "Add a new person" and they would automatically be categorized as a staff member.
Here’s an example of a node reference link to "Add an update about this event" at the bottom of an "Event details" page:
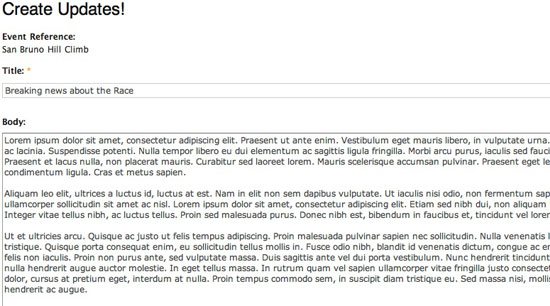
And here’s what the new data entry field looks like for that particular update:
3. Views Attach
In the example above, creating the "Staff" category also created the "Staff" page. You can use the Views Attach Drupal module (it requires the Views module) to create a content view related to that category. Here is a video showing you the power of CCK, Views, Node Reference URL Widget (above), and Views Attach used together.
Some ideas:
- You could create a view of all people who are categorized as "Staff" and a grid of staff headshot photos to display on that page.
- You could create a view of all documents that have been assigned to the Staff category, and then display the view of all documents (such as human resources documents, PDFs, etc.) directly on the Staff page.
- You could create a "Restaurant Details" page, then use the Node Reference URL widget to add a link to "Add a review to this restaurant," then use Views Attach to create a list of all member-submitted reviews directly under the restaurant’s details.
The following example shows the Views Attach module in action:
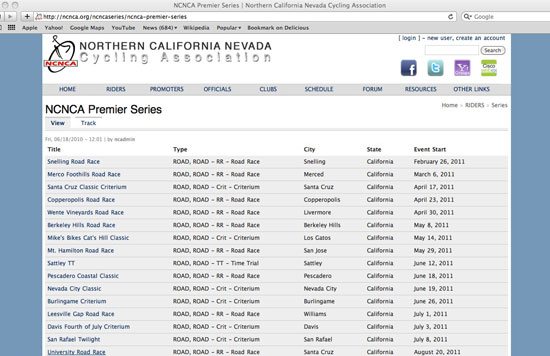
In the example above, we have a content type called "Series." Every series page has a built-in view that pulls in all of the content types marked as belonging to that series. This view can be themed or edited as desired; it can be displayed as a grid, list, table or slideshow.
4. Automatic Nodetitles
Sometimes you want to generate content automatically. Automatic Nodetitles generates titles for your content based on various criteria, including the date of creation, the user name responsible for the content, or the "parent" of a particular node.
For example, I personally have a "Product" content type. I want every new product image that falls under the "Product" content type to be automatically named with the parent product title. You can specify a token to generate the desired title of your node.

In such a case, whenever content is created, a node title will also be automatically created.

Here are the four new nodes and their automatically generated titles:

5. Nodewords
For search engine optimization (SEO) purposes, you might need to add certain keywords to certain nodes (e.g. "pages", "announcements", "posts", etc.) on your website. The Nodewords module lets you specify keywords or key phrases on a node-by-node basis (instead of a website-wide, cascading basis). You can then track results with Google Analytics or Drupal core’s statistics-tracking feature.
6. ImageCache
The Image Drupal module defines sizes that you can adjust for any image uploaded by a user. The ImageCache module extends this functionality and lets you set up "presets" for image processing that include cropping, desaturating color, resizing images to exact sizes, rotating, resizing by aspect ratio, scaling and sharpening.
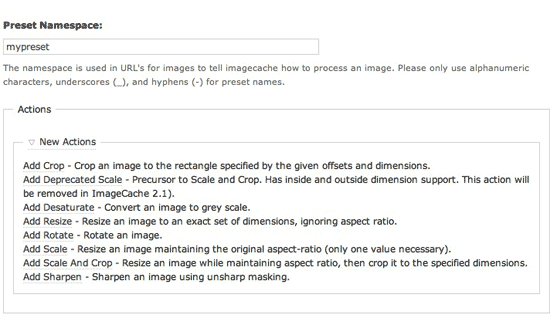
Note: This module has been moved into Drupal 7 core, but is still useful to Drupal 6 (and below) users.
7. Views Slideshow
Most websites need some way to fit multiple pieces of information into a fixed space. This can be done by creating a "View" of particular data on your website. The Views Slideshow Drupal module can help make this view more interesting.
For example, you could create a view of the most recent articles, and then use the module to cycle through that view. You could set up a "Recent highlights" section showing the articles’ titles, images and teasers. You could set up a "Top-rated products" list that shows images, "Add to cart" links, titles and descriptions.
In the example below, we’ve created a slideshow of articles with a fade-in effect on the large photo and thumbnails across the bottom. The user clicks on a thumbnail to get to each article.
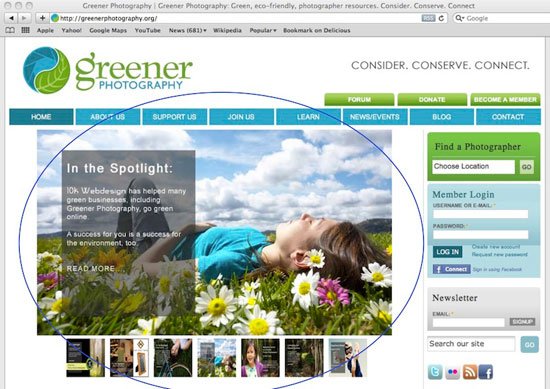
In this next example, we’ve created a slideshow that fades in a variety of image details of certain products.
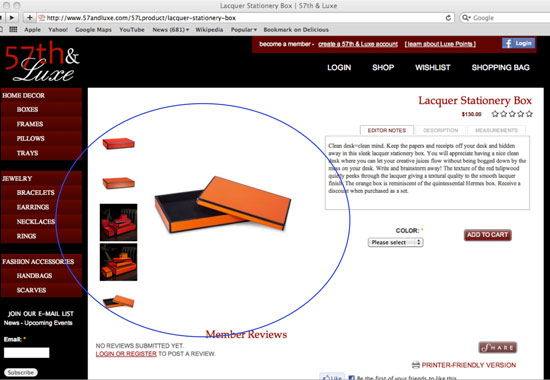
8. Nodequeue
If you want to highlight certain items in a section, like an "Editor’s pick" section, and you want the website administrator to control what appears in that section, then the Nodequeue module will prove useful to you. The node queue can be set up to display according to your specifications.
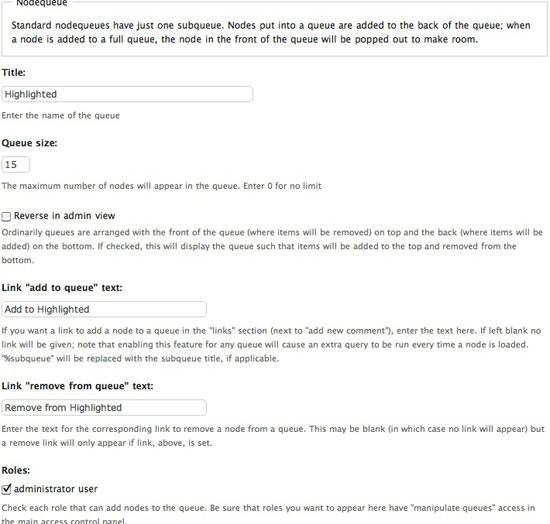
In this case, I’m allowing 15 articles in the queue at any given time:

To add an item to the queue, a user with adequate permissions simply clicks "Add to highlighted" at the bottom of the node.
9. String Overrides
If you need to change the default language of parts of your website, you could hack the Drupal core code–strongly not recommended, just don’t do it–or you could use the handy String Overrides Drupal module to find a string and then override the matched text. This module lets you control a specific phrase anywhere on your website.
For example, on one of my websites, I needed to change the default check-out message because it didn’t suit the organization. I used String Overrides to make this task simpler.

User Engagement and Game Mechanics
10. Better Formats
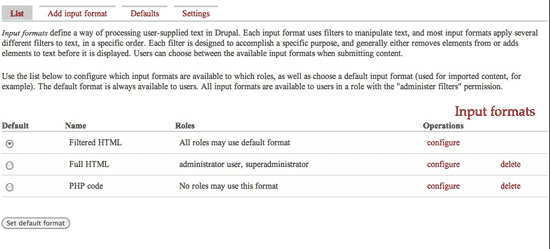
Drupal comes with basic support for input filters, which allow administrators to specify what kind of HTML can be added by users. For example, an administrator might want to strip all formatting for novice users but allow links, bold text, italicized text and tables for advanced users. When a user creates content for a Drupal website, they have to specify which "input filter" they want to run their content through prior to publication–this can be an inconvenience, and can open the CMS to content-rendering issues because of an incorrectly chosen input filter.
However, with the Better Formats Drupal module, you can extend support for the default input filter that is assigned to a logged-in user.
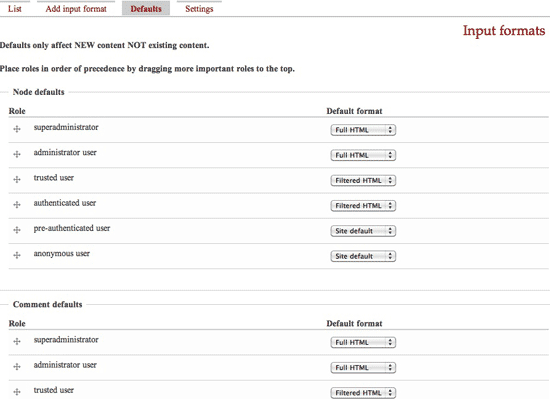
For example, perhaps only the content provided by an administrator would be set to the "Full HTML" filter. This would save users from having to specify which filter to use, especially if they are eligible for many different ones.
11. Flag
A website with user-submitted content must be monitored for spam and for submissions that are against submission guidelines. Use the Flag Drupal module to allow users to flag (or bookmark) content that they want to return to.
You can use this module for features such as "Add to bookmarks," "Mark as inappropriate," "Flag as helpful" or "Add to wishlist."

You could probably think of other reasons to flag content.
12. Organic Groups
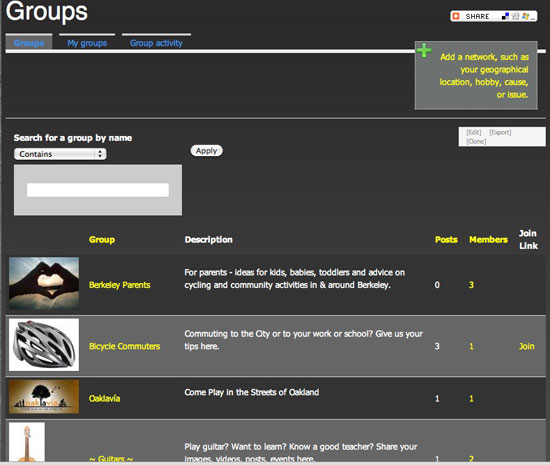
Organic Groups (OG) is an amazing resource for building mini-communities centered on specific causes or issues. OG lets your users self-organize by maintaining public and private groups and posting messages directly to their groups.
It’s an excellent way to encourage users to own their presence on your website. Each group can have subscribers and a landing page where the subscribers communicate between themselves.
13. Private Messages
The Private Messages Drupal module gives users their own inboxes on your website and the ability to communicate with one another.
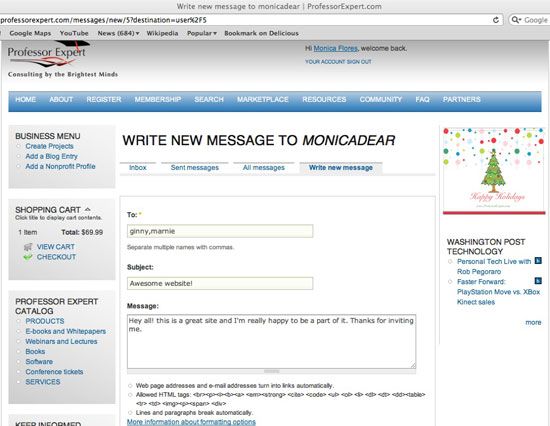
It’s used in conjunction with many other modules, such as the Advanced Profile Kit module, with which users get their own dashboards, and users with appropriate permissions can send private messages.

Private Messages can also be used in conjunction with the Advanced Forum module, in which users with appropriate permissions can send private messages to those who post in forums.

14. User Points
Social news and user-generated content sites such as Reddit, Hacker News, and Stack Overflow use a gaming mechanic often referred to as "karma" to encourage users to participate by being able to earn points for certain tasks (such as submitting good content or leaving a thoughtful comment that gets upvoted by other members).
You can set up a similar feature in your Drupal-powered website that assigns points to user-generated content. You could award points to users who complete their profiles, upload images, post comments or add events to the calendar.
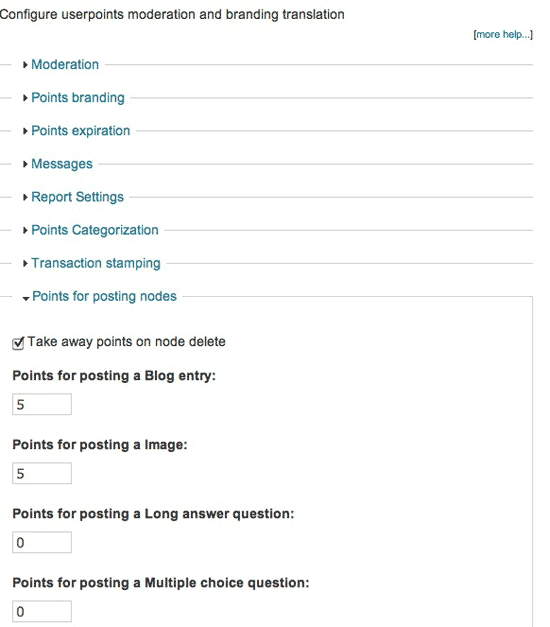
Another novel way to integrate points into your website is to let users trade points for store merchandise and other perks. I’ve also seen users treat points as a kind of in-site currency; points are exchanged on the website, and real money is exchanged for points (for example, a user could purchase a product worth 250 points to quickly increase their total).
15. User Badges
Consider using User Points in tandem with User Badges–a Drupal module that allows users to unlock badges based on how many points they redeem. Alternatively, user badges could be awarded based on their participation or for doing certain tasks, which can then be measured with titles like "Sheriff," "Mayor," "Diamond user" and "Moderator," similar to social sites such as Foursquare.

16. Invite
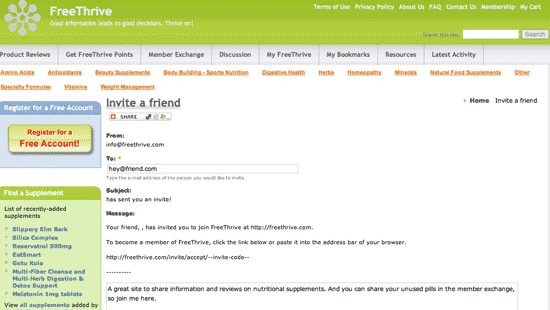
Invite is a standard invite-by-email module that allows users with appropriate permissions to send invitations to their friends via email messages generated by your website, similar to invite-only community sites such as Dribbble and Forrst.
Invitations can be tracked and constrained (i.e. limiting the number of invitations available to each user). You can grow your website organically by challenging users to send invitations to their real-life contacts.
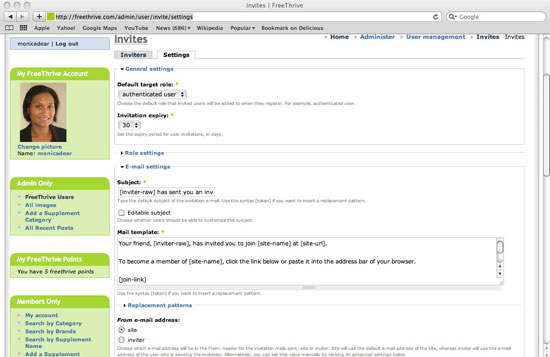
Invitation settings can be done by the administrator, as shown below:
17. GMap
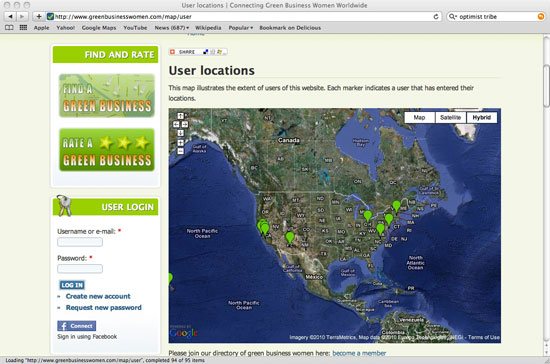
Google Maps can integrate well with website content. Perhaps you’d like to add a "location" to a certain node (say an event, product or blog post). Use the GMap module to assign and display a map for certain content or users on your website. To use this module, you must sign up for a Google Maps API Key for your website.
18. Ubercart
Ubercart–a free open source e-commerce solution –is the most widely used e-commerce module for Drupal. Out-of-the-box users with adequate permissions, for example, can add products and allow authenticated users to purchase those products with check-out functionality. Enable a payment gateway such as Authorize, Google Checkout or PayPal to accept payments, and you’re ready to start selling your goods on the Web.
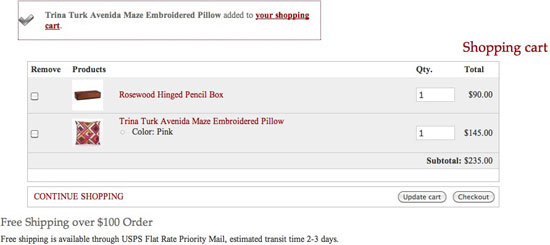
Ubercart features include shipping-quote integration with UPS/USPS, discount coupons by percentage or fixed amount, stock inventory control and many pre-built reports to track orders and customers.
There are plenty of configuration options and documentation in the official Ubercart site, if you would like to learn more.
User Registration
19. Login Toboggan
In Drupal, a website can have both public users (anonymous) and authenticated users (registered and signed into the system). During the authentication process, you can assign statuses to users; for example, you could offer memberships for a fee, or make day passes available with which users can get bumped up to a status that has more access permissions.
The Login Toboggan Drupal module helps you exclude pre-authenticated users–those who have registered but not yet confirmed their email addresses–from common functions and tasks that authenticated users are permitted to do.
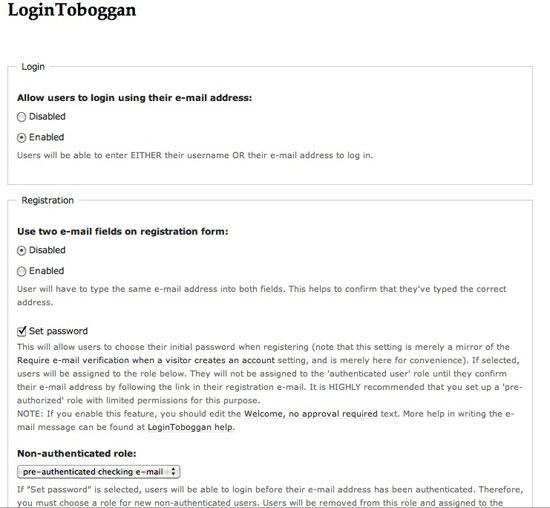
For example, I use Login Toboggan to assign a "pre-authenticated" status to a new user. At this stage, the user can review website data but cannot post reviews, give star ratings or add comments until they verify their email address. Once the user confirms their email address, Login Toboggan assigns an "authenticated" status, and the user is granted all of the abilities of authenticated users.
20. Facebook Connect
Facebook Connect is a nifty Drupal module that allows you to streamline the user registration process by letting users register and sign in with their Facebook accounts using Facebook’s authentication API.
If your website’s users are already on Facebook, consider opening up access to your website by allowing them to log in with their Facebook username and password, making it more convenient for them, as well as for you, so that you don’t have to store any user account data (such as passwords and email). This module requires you to sign up your site on Facebook.
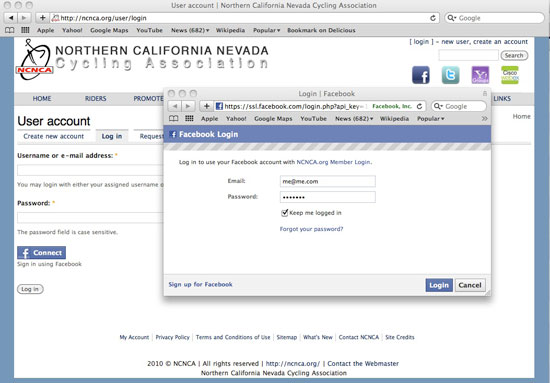
To extend your Drupal-Facebook integration, try the DrupalforFacebook module. It integrates Facebook Connect, "Like" buttons, stream publishing and extended permissions for sharing information between a user’s Facebook and Drupal website profiles.
Conclusion
As you probably know, this is but a small sampling of the available modules in Drupal. As always, before working with new modules, back up your database, and save a copy of your website prior to making changes. To evaluate a module, go to its project page (which are all linked above) and review the bug list, the documentation, live versions of the module and the number of downloads (to see how popular it is).
No comments:
Post a Comment